Creating Visual Schedules for You and Your Child
This is the transcript for part 3 of our webinar Maximizing Your Child’s Independence in Online School. We highly recommend watching it in the video format. Click here to watch it now.
This portion appears in the video from 25:28- 38:24. Return to part 1 to learn about self care for you and your child. See part 2 and part 4 for more tools you can use to maximize independence.
Part 3: Visual Schedules for You and Your Child
So these are examples of some ways that you can create something that your child can use. To reference when you are and are not available. It looks a little bit complicated at first. But it's really something that isn't that difficult once you get used to it.
For your teen or preteen (middle school and up)
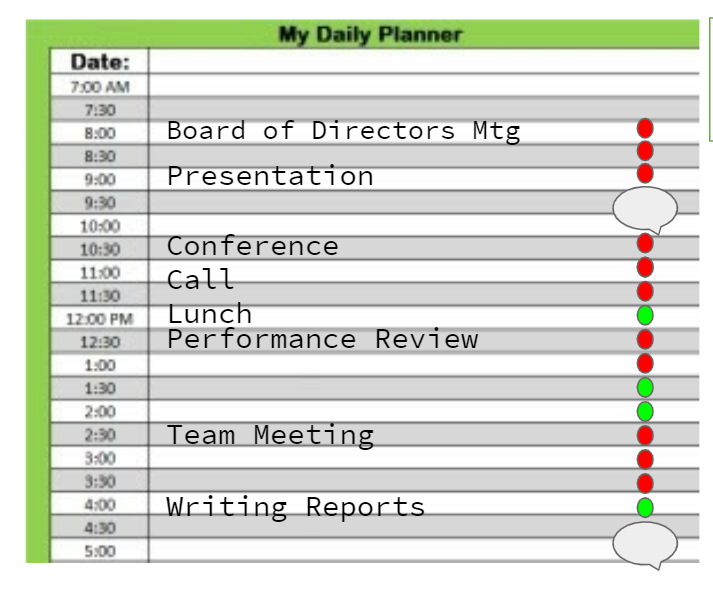
So on the left hand side there we have a planner page. That could be something that you could post on the door to your home office. You could put it on your child's bulletin board for the day. Anywhere where your child has access to it.
You can just take your normal schedule. And stick those little red and green dots on it. You can do it with markers. You can do it with stickers. Just to identify that “these are the times when you can interrupt me.”
“Medical emergency only” is what those red dots mean. And these are the times where you should only interrupt me if you're really bleeding. So absolutely if there's a serious crisis, interrupt mom or dad. You’d get that phone call at work normally.
But the red dots generally mean don't interrupt. And then the green dots mean “hey if something comes up during this time frame you can come see me.”
So an older child that might be old enough to use a planner themselves can really handle it when it's in that planner format. And that might be the format that you most naturally use yourself. You might be able to just print out your calendar and stick some dots on it. Stick it in a place where your child can see it.
Making it Work for All Ages
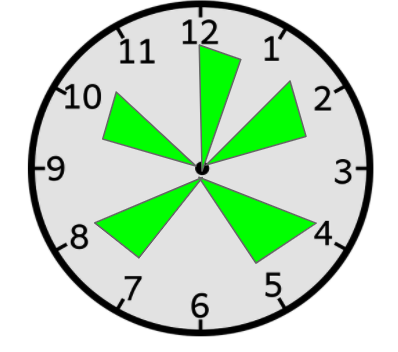
For a younger child it really needs to be even more visual and less verbal than that. In the clock example that's up there, when the short hand is on green it’s okay to interrupt. I would recommend using an actual physical clock for this.
If you don't have an analog clock in your house or your child's room I would suggest getting one. Of those really inexpensive $5 clocks. The plastic ones that they sell at Target.
Use some dry erase markers and actually color in the wedges of the clock where you have available time. So that on that clock the short hand is physically in that green triangle. When it's an okay time for you to be interrupted.
When we look at the schedule on the left it doesn't look like this parent has a whole lot of available time. But that's because we're just looking at that condensed portion of work day and school day.
When we look at the whole day we can see that before work starts from 7 to 8 that parent has a time when it's okay to ask for help. Or when you might even have a family activity like breakfast together or something like that scheduled. And there are other blocks when you might be available.
If your schedule moves and changes really frequently you might need to put the clock some place where you can reach it really quick. To erase a block of time and move a block of time. Or put your schedule somewhere where you can switch it out really quickly so that your child knows as things are changing.
This is what a visual schedule would look like for you. It can be a really really helpful reference point for your child. Now let's look at visual schedules for a child.
Setting Behavioral Expectations for Preschool to Elementary Age Children
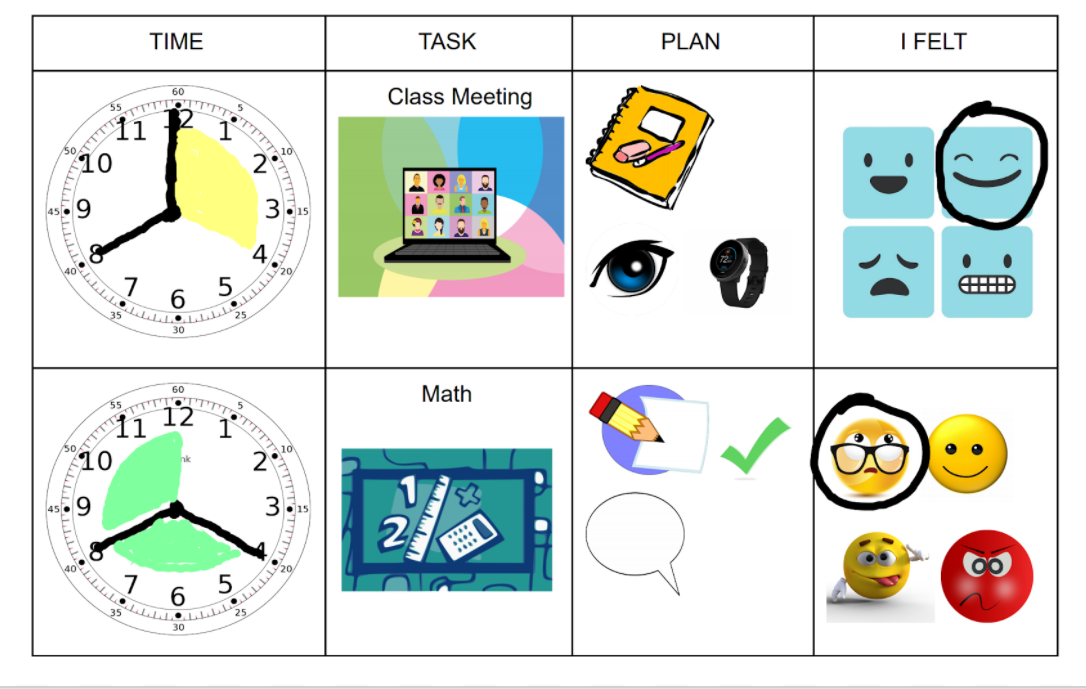
This is actually an adaptation of a visual schedule. It’s for a child who is learning to track their own feelings. So that right hand column doesn't always exist.
We will be sending all of you a template for a visual schedule. And it won't have that right hand column on it. Right now when we're adjusting to online school I would not recommend adding that layer for your child.
I would just stick with the time, task, and plan columns. So you'll see that you'll get the template with all of those little graphics in it as well. If you're watching this later online, in order to get this template and the rest of our online school tool kit you can simply sign up for our newsletter on our website.
Ok, so on a young child's visual schedule you might have two or three class periods a day with breaks in between. You might have a schedule that's more like 5 class periods with occasional breaks. You're going to adjust this to what your child has.
The task column is what they generally need to do in that moment. You're going to a class meeting. You're going to math class. We’ll see on the next page that we’re also incorporating breaks and things like that.
The plan section is for the tasks that you need your child to do during that time. So this is a schedule for a child that might be inclined to get distracted. Or forget their materials. Or show up late to class.
So we have these visual reminders here. Bring your materials = the notebook, pencil, and eraser. Keep your eyes on the teacher. We've got the eyeball there. And show up on time for class. We've got a watch.
These symbols only work if you're having a conversation with your child and choosing them together. But this is a really nice shortcut for kids of all ages.
You can use it for teens as well. You just might use slightly less cutesy pictures. They can draw their own or create their own color coded reminders. However it will work.
But it's really important that it has this visual component. So that it doesn't take any brain power to look at it. You just look at it and you go “oh yeah that's what I'm supposed to do right now.”
On the left hand side where you have the time, the clock hands are set up at the time of the activity starts. And then that little shaded section of the clock is showing you how long activity lasts.
It’s really important especially for kids that are averse to the learning process. Where they're just waiting for recess. It’s really important for them to see that it has an endpoint.
And the clock is going to advance toward that endpoint. You can show that by coloring in an actual physical clock like I was talking about doing for the parent schedule. But you can also set it up this way where they just see this is how long this activity is going to last.
There are some really great tools when you're in and out of the room between class periods with your child. Which with a preschooler you really might need to be in and out of the room very frequently. There are some cool tools like this time timer. (It is actually called the “time timer.”)
It allows you to turn the time on and create that chunk of time on the clock for them to see. If we're counting down with the time timer on a 15 minute task, that would just sit with your child to show them how long it's going to be until that 15-minute task is over.
This also helps them see how many things they have to get through. Before they get to the fun stuff. Before they get to recess. Before they get to a break. Before they get to time with you.
How Can I Help My Child Pay Attention?
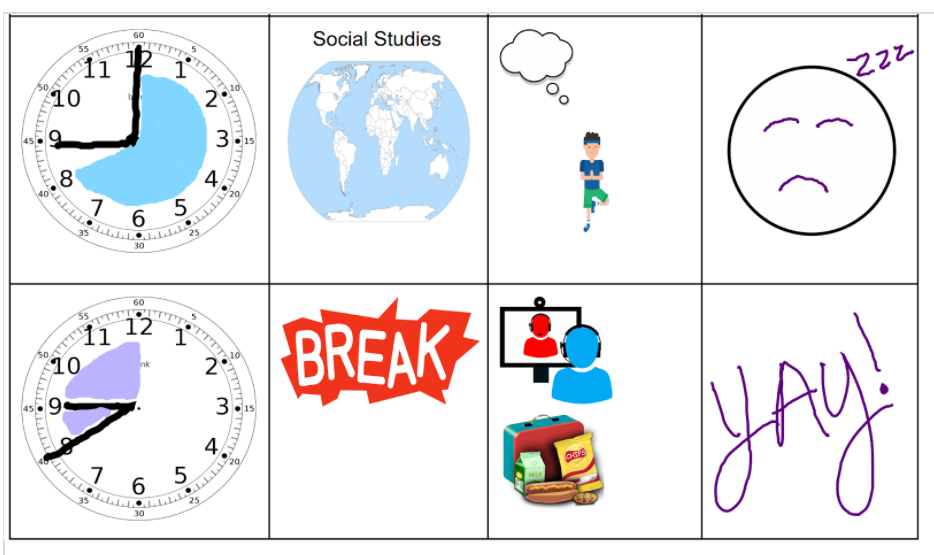
Let's look at the second half of this child's morning schedule. And you can see that up there's a third class for this kiddo before the break. And the things to remember to do during that third class are a little bit different. Because we know (we saw on the emotion side of the previous one) that the child was getting overwhelmed.
They needed to remember to check their work and to ask for help in math. They were feeling really overwhelmed in that moment. And so now they are drained coming into social studies.
This child is going to need a movement break in social studies. When they haven't been provided one before that. So we have the picture of the child doing a yoga pose.
This is reminding this child “get up physically out of your chair and do something with your body.” (While you're paying attention to social studies.) This is going to help you really stay on task.
And then we have the little thought bubble there. Just to remind them to tune in the brain. Do some thinking about what you're learning in social studies. That will also really help keep you engaged.
For this child who's tracking their feelings we can see that they filled in the face over there on the right hand side. To say they were really sleepy during social studies. This is letting us know that maybe they didn't use those tools that were in the plan section. Or maybe they weren't enough.
Maybe we need something else there. So that's where the feelings tracking can really help you as a parent. We have in this example 4 different ways of tracking the feelings.
We've got different feeling faces in those first two rows. And then down here on the second page, just a blank circle. They can fill it with a feeling face. Or just empty space that they can fill in with a word or drawing.
We see for break time the child he had a great time. He’s really excited about that. And the plan for break time might be playing an online game with a friend. Or it might be having lunch. So those two things are there on the break time section.
Let me go back a slide here for a moment and just click into what the visual schedule template looks like. Again this is the template that you're going to get. That you can, if you choose, set up for your own child.
There we go. So we have the blank clocks that are already in there for you. You'll see that as you scroll down in the template you have all these little graphics that you can pull from. Just to plug into your child's visual schedule. And they're already sized so that they fit the boxes.
So it's really easy. But if your child doesn't like the pictures that are there... or if you're working with an older child that maybe wants to create their own, you can create drawings to go in the boxes as well.
Family time matters.
I would really recommend including time with you on the visual schedule. So when there is an opportunity for your child to be spending time with you...
Maybe you're having lunch together. You're having snack together. You've planned a game together. You've got something going on where you can spend that time with your child. Put that on the visual schedule.
Especially really young kids are going to be looking forward to that. That predictability is going to soothe some of their anxiety. Knowing when they really have access to you.
That's on your visual schedule. But it can also be on their visual schedule. And you can have them draw a picture of the two of you together to be the symbol for that. Or you can take a favorite photo and cut it out and use that.
It can be really special for a kid to have mom or dad or other family time indicated on that visual schedule. So that they know it's consistently happening. And they can press through the tough stuff to get to the piece that they're really looking forward to.
Maria Smith LCSW-C: I think definitely include them in making this. And creating it. You know each child or young person has their different interests.
Whether it's Legos or Pokemon or anime or LOL dolls. Whatever it is. So that they feel connected to the schedule. And they feel like it's theirs.
And they can add their creativity to it. And then like if they're a little bit older, including drawing. Get creative with it. To kind of make it what they want.
So that they can see it. And they can also get a little bit of joy as they're looking at what their day is going to be like.
Robin Brannan LCMFT: The purpose of creating these tools up front is so that you don't have to be popping in all day long. Repeatedly. And structuring everything.
You have it there in a way that your child can reference. This is very much how a teacher does it in the classroom. You usually have a visual schedule for the day in the classroom.
Continue to part 4 to find even more tools for your parenting toolbox!


